Tuesday 24 March 2015

Stack trace: The company XX does not exist. (S)\Classes\DirParty\updateAddressFromDirParty - line 149

Hello friends
Recently  some users of the system i support were experiencing this issues while trying to create customer,vendor or end users in the system.
Users could  create the end user but when they try to add the address,they get the above error.
I resolved by adding the below code  in DirParty class, method UpdateAddressFromDirParty.


Place this code right after the following line:
dataAreaId = conpeek(addressDataAreaList,i);


Please test the code before moving it into production system...

Monday 23 February 2015

cannot execute a data definition language command on (). the sql database has issued an error

Hi friends;
As i was loading ax license file,i came across the above error.This error was occurring when tables were being synchronized.
I there figured out that this was a synchronization issue......

I therefore run the below job which helped me to identify the tables which could not be synchronized.
.....//Job

static void forceDbSynchronize(Args _args)
{
    Dictionary              dict;
    int                     idx, lastIdx, totalTables;
    TableId                 tableId;
    Application             application;
    SysOperationProgress    progress;
    StackBase               errorStack;
    ErrorTxt                errorTxt;
    ;

    application = new Application();
    dict = new Dictionary();
    totalTables = dict.tableCnt();
    progress = new SysOperationProgress();
    progress.setTotal(totalTables);
    progress.setCaption("@SYS90206");
    errorStack = new StackBase(Types::String);

    lastIdx = 0;
    try
    {
        for (idx = lastIdx+1; idx <= totalTables; idx++)
        {
            tableId = dict.tableCnt2Id(idx);
            progress.setText(dict.tableName(tableId));

            lastIdx = idx;
            application.dbSynchronize(tableId, false, true, false);
            progress.incCount();
        }
    }
    catch (Exception::Error)
    {
        errorTxt = strFmt("Error in table '%1' (%2)", tableId, dict.tableName(tableId));
        errorStack.push(errorTxt);
        retry;
    }

    setPrefix("@SYS86407");
    errorTxt = errorStack.pop();
    while (errorTxt)
    {
        error(errorTxt);
        errorTxt = errorStack.pop();
    }
}

This job will help you identify the tables but it wont resolve the issue::

Solution:
I therefore employed a trick though it came after trying so many options...

This is how you go about this issue,

  1. Identify tables using the above code
  2. Go the the AX database in sql server management studio
  3. Rename all those table as old  example " abc.old"
  4. After renaming all those tables, go back into ax AOT then try to synchronize specific tables one by one.
  5. Note,some tables will synchronize others will give you an error-dont worry of this.
  6. After the above process,go back to the sql management studio then to your database
  7. You will notice new tables have been created with the names similar to those names you changed(without .old).
  8. Now,delete all those tables,then RENAME the tables you changed earlier back to there original names.
  9. After this process,now go back to AX(Administartion-periodic-sql administration-All tables-check/synchronize)
  10. This will resolve your issue..
           Thanks and keep reading for me ...


Friday 6 February 2015

X++ Code to Get the current company language

static void GetCompanyLanguage(Args _args)
{

str language;

language = companyinfo::languageId();

info(language);
}

Thursday 20 November 2014

Developing a SSRS report using the Report Data Provider in Microsoft Dynamics AX 2012

Overview

There are multiple methods to develop SSRS reports in Microsoft Dynamics AX 2012. This tutorial will guide you in developing Report Data Provider (RDP) based SSRS reports.
RDP based SSRS Reports are used when complex business logic cannot be achieved using AOT query.

Pre-requisites

  1. Microsoft Dynamics AX 2012
  2. Visual studio 2012
  3. SQL Server Reporting Services (SSRS) must be configured
  4. Reporting services extensions must be installed in Dynamics AX

Important Concepts

  1. Report Data Provider (RDP) Class

  2. Report Data Provider Class is an X++ class that is used to access and process data for a SSRS report. The RDP class processes the business logic based on a specified parameter and/or query and returns a dataset to the reporting services. In order to create a RDP class in AX, you have to extend that class with SRSReportDataProviderBase. This tells AX that this class will be used by reporting services to process the data.
    Two important attributes are used in RDP classes:
    1. SRSReportQueryAttribute: specifies which AOT query will be used in this report. If the RDP class uses an AOT query to process data, define this attribute at the beginning of the class.
    2. SRSReportParameterAttribute: defines the data contract class that will be used by this report to prompt for parameter values. If the RDP class contains any parameters this define this attribute at the beginning of the class.
    Both the attributes are optional. If the report does not use any query or does not want any parameter to filter report data, these attributes do not need to be used.
  3. Data Contract Class

  4. A data contract class is an X++ class which contains parm methods with the DataMemberAttribute defined at the beginning of the method. This class is used to define one or more parameters that will be used in a SSRS report.
  5. Table

An AX table is used as the dataset to store data for the report. The RDP class processes the data and stores it in the table which is then used by a SSRS report to render data.
A table can be a temporary table (InMemory or TempDB) or a regular table, but it is Microsoft best practice to use a temporary table.
The type of temporary table is based upon the performance considerations. InMemory temporary table is used when the data set is small, while TempDB is normally used for larger datasets to improve performance.

Scenario

As part of this tutorial, the report will print a list of customers and their invoiced sales order counts.

Steps

  1. First of all, create a temporary table. Open AOT à Date Dictionary à Tables.
  2. Right Click on Tables and create a new Table called CustReportRDPDemoTmp.
  3. Set the TableType property to InMemory. This will define the table as a temporary table.


  4. Expand the CustReportRDPDemoTmp table node and add the following fields in the table:

  5. S. No. Field name Extended Data Type Label
    1 CustAccount CustAccount
    2 Name Name
    3 SalesOrderInvoiceCount Integer Sales order invoiced

  6. The final table should look like the following:


  7. Now create a RDP class. Go to Classes and create a new class called CustReportRDPDemoDP by right clicking on Classes and selecting New Class. It is a best practice to suffix the RDP class name with DP .


  8. Open the Class declaration by right clicking on it and selecting View code.


  9. Now write the following code:
  10. Add a new method and name it getCustReportRDPDemoTmp. This method is mandatory because reporting services uses this method to get the table buffer containing the processed data. The SRSReportDataSetAttribute attribute is used to indicate the temporary table name and also tells the reporting services to use this method to retrieve the processed data.
  11. Write the following code in the method:
  12. Add a new method and name it processReport. This method contains the business logic and is called by reporting services to generate data.
  13. This method will query customer details and fill the temporary table buffer. Write the following code in the method:
  14. Now create a new report. Since the development of a SSRS report is done in Visual studio, we first need to create a new project in Visual studio.
  15. Open Visual studio. Go to File à New à Project
  16. In the Installed templates section select Microsoft Dynamics AX and then select Report Model in the right pane. Name the project RDPBasedDemo and press Ok.


  17. A new project will be created as shown below.


  18. Now add a new report in the project by right clicking on the project RDPBasedDemo à Add à Report.

  19. A report will be added to the project with the name Report1. Rename the report RDPBasedDemo.
  20. Now double click the report to open it.

  21. The description of the individual node is given below:
    1. Datasets: Datasets retrieve data from RDP class. It acts as a bridge between AX and the SSRS report. Only the fields added in the datasets can be used in a report.
    2. Designs: It defines the layout of the report.
    3. Images: It contains the images that you want to display in the SSRS report.
    4. Data Methods: It contains the business logic which can then be used in the report.
    5. Parameters: It is used to apply filtering to the data in a report. All the parameters defined in the data contract class are automatically added here when the RDP class is defined in the datasets.
  22. Now you will want to create a new Dataset by right clicking Datasets àAdd Dataset. Name it CustDetail.


  23. Select the CustDetail dataset and open the properties window. Set the Data Source Type to Report Data Provider. Then select the Query field. An ellipse button appears. Click it to open a dialog box.


  24. This dialog box lists all the RDP classes present in the AOT. Select CustReportRDPDemoDP and press Next.


  25. Select the fields to be displayed in the report and press OK. Only the fields selected in this dialog box can be shown in the report.


  26. There are two types of designs that can be created in a SSRS report:
    1. Auto design: Visual studio automatically creates a design based on the dataset provided. Auto design is the preferred method because it is easy and usually fulfills the majority scenarios.
    2. Precision Design: This is used when you need custom placement of fields or the layout of the report is too complex.
  27. In this demo we will use Auto Design. Now right click the Designs nodeàAdd àAuto Design. A new design is added. Rename it Design. It is recommended that you set the name of the Design to either ‘Design‘ or ‘Report‘.


  28. Now drag the CustDetail form to the Datasets node and drop it on the Design node. A table will be created which contain all the fields present in the data set. These fields will appear in the same order as in the report. So if you want to arrange the fields, right click the field and select either ‘move up’ or ‘move down’.
  29. The final design should look like the following:


  30. Now we have to define the layout of the report. Visual studio provides built in templates. Select the Design and open the properties window. Select ReportLayoutStyleTemplate in the LayoutTemplate field. Give a suitable title to the report.


  31. Select CustDetailTable under the Design node and open the properties window. Select TableStyleAlternatingRowsTemplate in the Style Template field.


  32. The report is now completed and can be viewed. To preview the report, select the Design node, right click it and select preview.


  33. Select the Report tab. The report will appear as shown below:

  34. To view this report from AX, Add the report to AOT and create an Output menu item and set the appropriate Properties. For further details on creating SSRS reporting, refer to our previous article ‘Developing SSRS report using Query‘.

Building a Simple Report–Precision Design


In this post, we will see how we can build a report using precision design. A precision design is like a pre-printed format where the placing of report controls, the design and the spacing matters a lot.
A precision design is the standard SSRS report designer following the same principles, rules and requirements as are found in a SQL Server Business Intelligence Studio SSRS designer.
We will again use the same example of printing Customer Id, Customer name and Balance but this time instead of creating an Auto Design we will use Precision Design.
I will also show how we can use some inbuilt parameters to display some generic information like page number, execution date and time etc.
Here we will use the same AOT query created in previous example Build and Deploy Simple Report–Queries: SKL_SampleCustomer
Create the Required Dataset
  • Open the previously created Report Model
image_thumb26
  • Right click on report model, select Add –> Report. Name the report SKL_SampleReportPrecision
  • Set the report title to “Customer balance”
image
  • Now in the report, go to the Datasets section and create new Dataset using the name Customer
  • In the query property, click the button image_thumb6
  • This opens up the query selection box to select a Microsoft Dynamics AX Query
  • From the list select “SKL_SampleCustomer” and click Next
  • image_thumb20
  • Here you can select required fields. Either you can select all fields or a subset
  • Expand All Fields nodes under the CustTable node to select “AccountNum”
  • Expand Node “All Display Methods” and select “name” and “openBalanceMST”
  • Click “Ok”
  • Now Right click on the designs node, select Add and then “Precision Design”. This creates a new Precision Design and name it as PrecisionReport
image
  • Now right click on new Design and select “Edit Using Designer”
image
  • This opens up the SSRS Designer (same as standard SSRS)
  • You can see the standard Report Item tool bar from where you can drag and drop the controls onto the designer surface
image
  • Now from the controls tool bar, drag and drop the Table control onto the Report Designer
  • Select the Tablix and then set the DataSetName property = “Customer”
image
  • Now let us specify headers, Select one text box in the header section and right click, then select “Expression…”
image
  • In the expression editor, you can see lot of sections for Variables, Parameters, Fields, Datasets etc.
  • Here write the following in the space “Set expression for: Value” -  =Labels!@SYS316441
  • This displays the header text using the labels in AX. This label is “Customer”
image
  • Now again specify the values in Second and third text boxes in header row
  • 2nd Column Header(Name) : =Labels!@SYS117778
  • 3rd Column Header (Amount): =Labels!@SYS62867
Specifying the data for the table
  • Now in the data row, move the mouse to first text box and you should see a button on the right side that looks as shown below
image
  • Click the button and it displays the list of fields from the dataset, select required fields
image
  • Alternatively, you can right and use “Expression…” box to specify the data fields. The expression box looks as shown below:
image
Now that the data is ready, we will go ahead and change the look and feel of the report
Formatting the table
You can specify the lots of formats using the properties windows like Background color, Font type color etc. You can also use the formatting tool bar above to format the data
image
Go ahead and specify the borders for the table for each row. Then change the background of the Header row. Make the text in the header row as center aligned and make the font as bold
Select the table rows one by one and change the font to “Segoe UI” and Font Size to “8pt”. Now your table looks as shown below:
image
Now we will go ahead and a Page Header and Page Footer. In Page Header, we will add Report name, Report Title and Execution Date and Time. In the Page Footer, we will add the Page Numbers in the format (Page of Total Pages)
To enable Page Header and Footer, in the Report menu select “Add Page Header” and “Add Page Footer” options
image
image
Now drag three text boxes from tool box and drop onto the Page Header area. Place two text boxes on the left hand corner and one on the right hand corner as shown below. Drag and drop one text box in the center of the Page footer as shown below.
image
Select the first text box, Open the expression box and in the Category section, select “Built-in Fields. Now double click on “ReportName” field and it should add the report name to value section
image
In the same way select “ExecutionTime” in third text box. For report title, Type in “Customer balances” in the second text box
In the footer section, select the 4th text box and type the expression ‘=Globals!PageNumber & ” of ” & Globals!TotalPages’
Apply formatting as required. Now you should see the design as follows
image
Now close the designer, add the report back to AOT (along with the model) and deploy the report from within AOT.
Create a new menu item
Go to AOT –> Menu Items –> Output, Right click and select “New Menu Item”. Set following properties
image
Now run the report and the report will be seen as shown below:
image

Monday 3 November 2014

How to Install DAX on Stand alone Windows XP system:

Hello,


Unfortunately setup of AX on the computer outside a domain is prohibited by installer. But there is a trick for doing such thing and works good.
This trick is tested under Windows XP SP2, it does not work on Vista.
For Ax 4.0 Windows XP sp2 is required , for DAX 2009 Windows XP sp3 is required.
Here are steps of the trick (borrowed from AxForum):
1. Change the value of there registry key HKEY_LOCAL_MACHINE\SYSTEM\ControlSet001\Control\ComputerName\ActiveComputerName to any value which does not match the name of your computer
2. Set value of environment variable named “UserDnsDomain” to any other value
3. Run setup.exe
4. Restore values, changed on the steps 1, 2
5. Go to client and server setup in control panel and change computer name to the real name of your computer
In order to install EP,Workflow for DAX 2009 on Windows XP we need to install share point services on Windows XP . Please visit the below link
Install SharePoint on WindowsXP

AX2012 – Assigning permissions to users through Roles,Privileges and duties

All of us know that Security frame work is completely changed in AX2012. We are used with AX2009 way of assigning permissions to user groups and linking users to user groups.
Let’s get conversant with AX2012’s way of assigning permissions and restricting the forms and activities as required by our clients.
Whoever tried assigning permissions might have already noticed that user groups are no more in AX2012. So, to have the users assigned with needed permissions, user must be assigned with a Role that he/she performs. In a case where the user performs multiple roles, one can be assigned with multiple roles.
By default a good number of “Security roles” are available in AX. These roles have been created by keeping industry requirements in mind and also to achieve the standardization across the multiple business organizations. However, it is quite usual that clients’ requirements on permissions will be varying from one client to another client.
Below is the image that helps in understanding how the permissions are structured in AX2012.
AX2012-User rights
Each role will have the Set of duties that are relevant for the specific role. Duties comprises of set of privileges. Through Privileges, we give the permissions to the relevant forms, menu items and tables.
(I do not want to stress on definitions and terminology as loads of data available over Technet).
Let’s analyze and understand this completely using the role “Purchasing agent” as an example.
To see the different security roles available, Go to System Administration>setup >Security > Security roles.
Security roles
Focus on “Purchasing agent” then right side list box “Role content” shows the list of duties that will be applicable for the “Purchasing agent role’.
It gives the precise information on what the activities that the user with the specific role can perform. By seeing the content obviously we can’t understand what all that will be covered under each duty. For instance, let’s consider the duty “Maintain Vendor Master”. We do not know what all that comes if it says just “Maintain vendor master”.
Let’s see what all it covers, go to System administration>setup>Security>Security roles> Security privileges
Search for the needed duty “Maintain vendor Master”, it shows the list of “Privileges” that are covered.
Security Privileges
We can notice the privileges give little detailed information that what all comes in “Maintain vendor master”. Of course, we should know how the access is being given to forms. For which lets get into AOT, with the AOT name of duty.
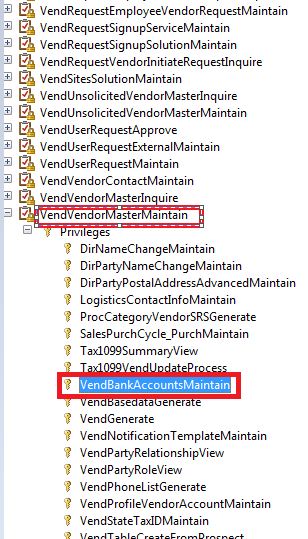
In the image you can see the AOT name of “Maintain vendor master” as “VendVendorMasterMaintain”.
Now, Go to AOT (by pressing Ctrl+D)>Security>Duties, find duty “VendVendorMasterMaintain”, and see the privileges(AOT names) to proceed further.
AX2012-Duties-Privileges
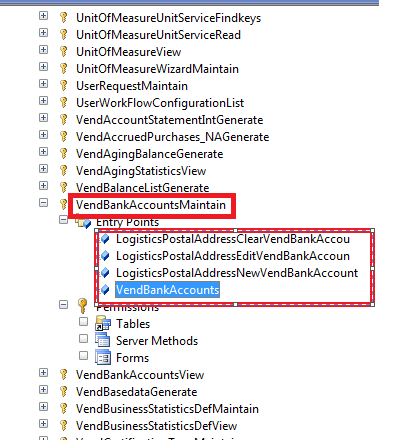
To find the forms that are been give the permission,
Go to AOT>Security>Privileges>“VendBankAccountsMaintaing” and expand the entry points node to know which forms are been given the access.
Privilegedetails
Hope it is clear now on how the access to forms is controlled using the roles, duties and privileges. In next post, we will see how to stop access to some forms in the already defined duty and also how to add a completely new privileges in duties.